
Though cast iron cookware provides superior heat retention and sears food beautifully, many people hesitate at the thought of actually cooking with these rustic pans. They've heard worrisome rumors about high maintenance and a mysterious process called "seasoning" (but not the salt and pepper kind). The truth is, seasoning and correctly washing cast iron isn't hard to do. And, if you do put in a little effort, breakfast foods (or any food, for that matter) will glide around your cast iron skillets, dutch ovens and griddles as well as any teflon pan.
What is seasoning, anyway? Seasoning is simply the process of baking cooking oil onto the surface of a pan until it dries into a moisture and rust-proof layer (or "patina"). This semi-permanent layer protects cast iron from rust, but also bestows it with natural non-stick properties. Reinforcing layers of this patina develop every time you use it, so basically, the more you cook with it, the more non-stick it gets.
How it's Done:
Start with a Clean Pan-
Hopefully, this initial scrub will be the last time you have to wash your cast iron skillet with soap. Soap breaks down fats, so it can deteriorate the patina of a good, seasoned pan with enough exposure. But if we can assume you're seasoning a brand-new skillet, or an old one that needs to be re-seasoned, it's best to start with a clean and clear surface. So scrub up your pan with a mild detergent and scouring pad. After you've cleaned the pan, make sure to rinse all the soap away with cold water and dry it well.
Warm Up the Cast Iron-
Set your clean and dry skillet in a 200° F oven for 15 minutes. Heat opens the pores of cast iron, so that it will easily accept the seasoning. Cast iron retains heat and the entire pan (including the handles) will get hot- so don't forget to use an oven mitt or potholder when you take the pan out of the oven. It's also a good idea to use dry kitchen towels or trivets to protect counter and tabletops.
Lightly Oil, Then Wipe It Dry -
Any cooking fat will work, but some make more sense than others. For example, there's absolutely no reason to waste extra-virgin olive oil or other expensive oils for your cast-iron seasoning. We use Crisco shortening because it's inexpensive and easy to apply. Use a clean, folded up paper towel to carefully coat the ENTIRE pan- interior, exterior, bottom, handle, and sides. Be thorough, then use some fresh paper towels and wipe away all excess oil. Do your best to wipe it dry- there should be no pools or drips of oil left.

Back to the Oven-
Place the oiled pan upside down, on a baking sheet and place both in the oven. Then set the oven to 350° F. Heat the pan at that temperature for two hours. Turn off the oven, but leave the pan inside and allow oven and pan to cool completely- about two hours.
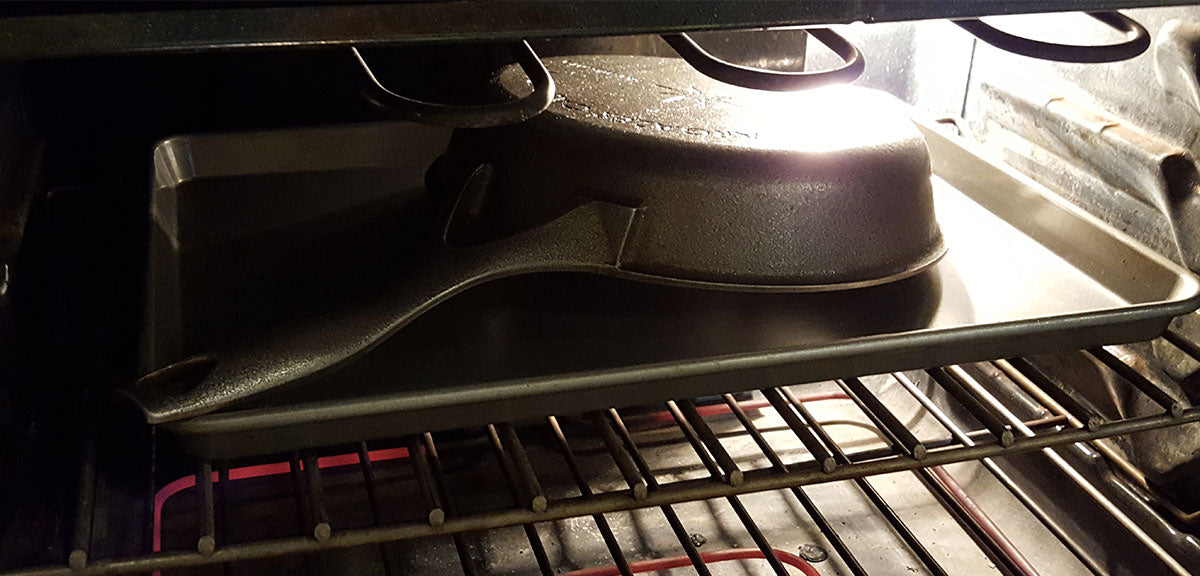
Pro Tip: If you want to ensure the thinnest and smoothest patina, after 15 minutes at 350° F, use a thick, dry towel to carefully remove the hot pan and set it on the range. You'll notice in our pictures below that the seasoning oil has "risen" a bit on various spots of the skillet. Wipe the pan dry again with a wad of clean paper towel, then return it to the oven for the remaining 2 hours, plus cooling time.

Your Pan Is Seasoned!
The before and after picture below shows the difference that seasoning makes, but you can feel the difference even more. Even with only one good layer of seasoning, the right side feels slick and smooth as glass. And it's ready to cook! However, if you would like to create a very durable seasoning and really jump-start the non-stick performance, you can repeat the process. Or just keep cooking with it, and your cast iron will have an increasingly dark appearance, and an ever-improving non-stick surface.

Maintenence is Key-
Deglazing with wine or cooking with a lot of acidic foods like tomatoes or lemon, can break down the top layers of patina. So depending on your cooking habits you may want to reseason the pan occasionally. You can simply re-apply per the steps above or, for quicker maintenance, heat the pan on the stove to remove any excess moisture and use tongs and paper towels to lightly coat the pan with oil. Wipe away any excess oil and continue to heat the pan over medium-low heat for a few more minutes before allowing it to cool and putting it away.
Otherwise, just make sure to clean your skillet the right way (you can learn all about that on our Cookware Cleaning page), and dry it completely before putting it away. See, cast iron cookware is easy to work with! Now you've got a perfectly seasoned pan with a sleek non-stick surface that gets more and more slick every time you fry potatoes or sear steaks. If you're like most of us, in time you'll look back and realize it's one of the most cherished pieces of cookware in your collection.
Want the Strongest Seasoning Possible?
Head to the health food store and pick up some flaxseed oil and use that to season your pan. Flaxseed oil is the food-grade equivalent of linseed oil, a very durable drying oil that's used by artists to give their paintings a hard, polished finish. When exposed to high heat, the fatty acids in flaxseed oil combine to form a strong, solid matrix that polymerizes to the pan's surface. This reaction is no different than what happens when you season a pan with any other oil, it's just that flaxseed creates a stronger bond. In fact, in test kitchens, pans seasoned with flaxseed oil were washed in a dishwasher (a no-no for cast iron) and came out shiny and unscathed. If you don't want to be bothered with frequent reseasoning, or you're not very gentle with your cookware, then flaxseed oil is the ideal seasoning oil for your pans.