*Free Shipping on $75!
Most items ship same day.
Most items ship same day.

— Post Updated Fall 2025.
Here's a cozy Christmas Meal to make staying home and playing it safe worth it. You don't need a huge crowd to be festive. Set the mood with a bit of champagne or sparkling apple cider with these fun, easy to make, and tasty Cranberry Pecan Cheese Balls.
An elegant Beef Wellington takes center stage at the dinner table. This traditional main coarse is paired with a lovely twist on simple baked spuds, Hasselback Potatoes. Add your favorite veggie, a winter salad and you have a cozy and delicious Christmas meal.
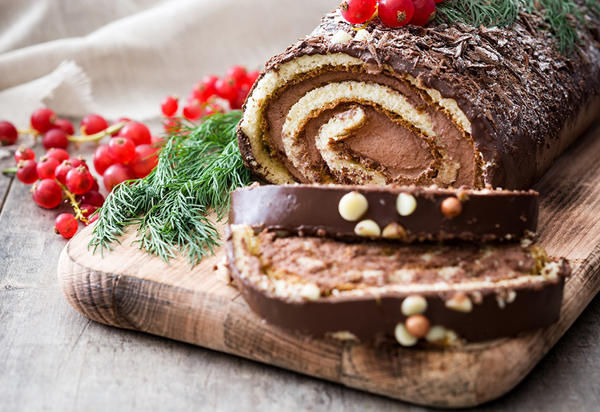
No, we did not forget dessert and it's a stunner! You'll want a second piece of this fabulous and festive, instagram-worthy Mocha Yule Log.

A festive pecan and cranberry appetizer, stuffed with garlic and chives, shaped into single-serving cheese balls. This dish brings a festive twist to the traditional cheese ball with dried cranberries, fresh chives, toasted pecans, garlic - all loaded into perfectly portioned single-served cheese balls!
This recipe comes together in less than 20 minutes - making it a great hors d'oeuvre to throw together right before dinner! (Just make sure you give them an hour to chill before serving.)

Prep Time: 10 minutes | Cook Time: 5 minutes | Servings: 12
INGREDIENTS:
DIRECTIONS:
1. Preheat oven to 375 degrees. Spread chopped pecans on a baking sheet. Bake for 5 minutes. Remove from oven.
2. Using an electric mixer, combine cream cheese, white cheese, chives, garlic powder, half of the pecans, and 1/2 cup of cranberries.
3. Use a spoon to divide the cream cheese mixture into 12 portions. Run your hands in cold water and then form each portion into a small ball. Refrigerate for 1 hour (or longer).
4. In a small bowl, combine the remaining pecans, 2 tablespoons chives, and 1/2 cup cranberries.
5. Once the cheese balls have finished chilling, remove from refrigerator, and roll the balls in the pecan-cranberry-chive mixture.
6. Stick a pretzel stick in center of each ball. Serve chilled.
A juicy beef tenderloin wrapped in earthy mushrooms, flavorful prosciutto, and golden pastry. If you want to truly impress yourself this year, give this Christmas Beef Wellington a try. Bursting with flavors of seared tender beef, spicy mustard, mushrooms duxelles, and savory prosciutto, this is one traditional Christmas dish you can't miss this year.
If there ever was a way to end 2020 it would be with this beef wellington.

Prep Time: 15 minutes | Cook Time: 2 hours and 30 minutes | Servings: 6
INGREDIENTS:
For the Beef:
For the Duxelles:
DIRECTIONS:
1. Using kitchen twine, tie tenderloin in 4 places. Season generously with salt and pepper.
2. Over high heat, coat bottom of a heavy skillet with olive oil. Once pan is nearly smoking, sear tenderloin until well-browned on all sides, including the ends, about 2 minutes per side (12 minutes total). Transfer to a plate.
3. When cool enough to handle, snip off twine, and coat all sides with mustard. Let cool in fridge.
4. Meanwhile, make duxelles: In a food processor, pulse mushrooms, shallots, and thyme until finely chopped.
5. To skillet, add butter and melt over medium heat. Add mushroom mixture and cook until liquid has evaporated, about 25 minutes. Season with salt and pepper, then let cool in fridge.
6. Place plastic wrap down on a work surface, overlapping so that it’s twice the length and width of the tenderloin. Shingle the prosciutto on the plastic wrap into a rectangle that’s big enough to cover the whole tenderloin. Spread the duxelles evenly and thinly over the prosciutto.
7. Season tenderloin, then place it at the bottom of the prosciutto. Roll meat into prosciutto-mushroom mixture, using plastic wrap to roll tightly. Tuck ends of prosciutto as you roll, then twist ends of plastic wrap tightly into a log and transfer to fridge to chill (this helps it maintain its shape).
8. Heat oven to 425°. Lightly flour your work surface, then spread out puff pastry and roll it into a rectangle that will cover the tenderloin (just a little bigger than the prosciutto rectangle you just made!). Remove tenderloin from plastic wrap and place on bottom of puff pastry. Brush the other three edges of the pastry with egg wash, then tightly roll beef into pastry.
9. Once the log is covered in puff pastry, trim any extra pastry, then crimp edges with a fork to seal well. Wrap roll in plastic wrap to get a tight cylinder, then chill for 20 minutes.
10. Remove plastic wrap, then transfer roll to a foil-lined baking sheet. Brush with egg wash and sprinkle with flaky salt.
11. Bake until pastry is golden and the center registers 120°F for medium-rare, about 40 to 45 minutes. Let rest 10 minutes before carving and serving.
***This recipe is owned by delish.com.
A blend of fresh chives, thyme, and parmesan cheese sprinkled over crispy baked potatoes. One of the most versatile foods of all time is the potato.
While there are a million and one different ways to serve potatoes, this one just might be our favorite. Crisp on the outside, tender on the inside, these hasselback are essential to try at your next gathering.

Prep Time: 10 minutes | Cook Time: 1 hour | Servings: 8
INGREDIENTS:
DIRECTIONS:
1. Preheat oven to 375 degrees. Place aluminum foil on a baking sheet, and spray with nonstick spray.
2. Place two chopsticks on either side of one potato. Slice the potato into 1/8-inch-thick slices, stopping when you hit the chopsticks. (The chopsticks make it so you won't cut all the way through the potato.) Repeat this process for all 8 potatoes.
3. Lay the potatoes on the baking sheet and brush about 2 tablespoons worth of melted butter on the potatoes. Sprinkle with 1/2 teaspoon salt. Cover with foil.
4. Bake for 45 minutes with the foil on top of the potatoes. Then, remove foil and bake for 12-15 minutes more, until potatoes are tender. Remove the potatoes from the oven.
5. Move the oven rack 5 inches from the heat source and set your oven to broil.
6. In a small bowl, sift the bread crumbs, parmesan, chives, thyme, and remaining 1/2 teaspoon salt. Sprinkle the mixture on the potatoes. Spoon the remaining melted butter onto the potatoes, making sure to cover the entire crumb mixture.
7. Place potatoes back into the oven and broil for 2-3 minutes - keeping a close eye on them the entire time. Broil until the toppings are golden brown. Remove from oven.
A beautiful holiday dessert, one your coffee and chocolate-lovers will not be able to resist. Also known as a Bûche De Noël in French, the yule log cake has been a holiday favorite for years. Vanilla sponge cake with a rich mocha filling topped with chocolate buttercream frosting makes for a fun holiday sweet.

Prep Time: 1 hour | Cook Time: 15 minutes | Servings: 12
INGREDIENTS:
For the Cake:
For the Filling:
For the Frosting:

DIRECTIONS:
1. Heat the oven to 450F. Line a 17X12 jelly/sheet pan with parchment paper. Set aside.
2. In a mixing bowl add the 2 eggs, 3 egg yolks and 1/2 cup sugar. With the paddle attachment on, beat on medium to high speed around 5 minutes until pale in color and thickened. Add the vanilla extract and beat few more seconds.
3. Sift the flour and the cornstarch over the egg yolks mixture and with a spatula gently fold it in. Fold in the batter bits as well.
4. In a separate grease-free bowl, add the 2 egg whites and 1 tablespoon of sugar. With a whisk, whip until firm peaks form. With the spatula, fold the whipped egg whites into the egg yolks mixture.
5. Pour the cake batter into the prepared pan, spread it evenly and bake for 6-7 minutes until golden brown and, when touched, it springs back. As soon as you remove the cake from the oven, invert the cake onto a clean dish towel. Remove the parchment paper and roll up the cake with the towel. Place on a wire rack to cool
6. For filling, in a bowl, dissolve coffee granules in cream; beat until it begins to thicken. Add sugar; beat until stiff peaks form. Unroll cake; spread filling over cake to within 1/2 in. of edges. Roll up again, without towel and the trim ends. Transfer to a platter, seam side down. Refrigerate, covered, until cold.
7. For frosting, beat all ingredients until smooth. Spread over cake. Using a fork, make lines in frosting to resemble tree bark. Dust with powdered sugar and garnish with grated chocolate, if desired. Refrigerate until serving.
***This recipe was inspired by tasteofhome.com and atreatsaffair.com
Hey, before you go, make sure you're signed up to get the latest posts from our blog, Inspired Cooks, and a lot more!
Cook more. Eat better. And have more fun!
![]()
{"one"=>"Select 2 or 3 items to compare", "other"=>"{{ count }} of 3 items selected"}